Monday, December 19, 2011

How To Move Wordpress Website From Localhost To The Destination Server


A good guide on Posting your offline local test Wordpress site to your online web server. Thank Revolution Media for this great info. It work for me, and I think it will for you too. The original post is here


Did you ever experienced hard times trying to get your hand crafted Wordpress website transferred from your local test environment to the destination server? Did you spend countless hours trying to make things work? If you can answer yes to these questions then this article is for you. I’ll explain in plain English how to make a smooth transition from you localhost to the destination server.
Before we begin, I need to make some assumptions:
  • You have your website working perfectly on your local machine.
  • Local environment is either a PC or Mac on which you run a web server with PHP and a MySQL database and you have access to phpMyAdmin.
  • Destination server runs Apache or IIS, you have FTP details, access to phpMyAdmin, database server name, database name, database user name & password.
  • Other configurations may work as well.
  • It doesn’t matter which version of Wordpress you are using.
Also, a quick “executive summary” of all the steps below:
  1. Export your local Wordpress database to a text file.
  2. Search and replace http://localhost/yoursite with http://www.yoursite.com
  3. Create a database on your destination server and import your database.
  4. Copy all files from your local machine to destination server and amend wp-config.php file with new database details.
  5. If necessary change file and folders permissions so Wordpress will be able to use them.

Step 1 – Export Local Database To Text File

Open up your browser and access phpMyAdmin and select your website database from the drop down box on the left. This may look like this:
step1a
Step 1a (click to enlarge)
Go to Export section (click on the Export tab at the top). Depend on your version of the phpMyAdmin this section may look bit different but the functionality will be the same.
Click ‘Select All’ in the Export form. All tables should be selected now. Leave other options as they are. Navigate to the bottom and tick ‘Save as file’ checkbox. Click ‘Go’.
Step 1b (click to enlarge)
step1c
Step 1c (click to enlarge)
File save dialog will appear. Click OK and save that SQL file on your computer. Step 1 completed. Get yourself a coffee.
Step 1d (click to enlarge)

Step 2 – Search & Replace

Now, we have to change your database export file and find & replace all URLs that contain http://localhost/yoursite with http://www.yoursite.com
I’m using Dreamweaver but you can use any text editor to do the same.
Step 2a (click to enlarge)
We have to change another line as well. Find line C:\\Program Files\\xampp\\htdocs\\yoursite/wp-content/uploads and strip it down to /wp-content/uploads and finally save your SQL file.
Step 2b (click to enlarge)

Step 3 – Import Information Into Destination Server Database

On your destination server you have to create database for your WP installation. It may look like this screen below (assuming you’ll be using phpMyAdmin) However in most cases you’ll have to log onto your server administration panel and create database, user and password from there. It varies from provider to provider so please refer to your hosting provider help section.
Step 3a (click to enlarge)
Now as you have your database created you should populate it with your data. Click on the Import tab at the top of the page. Click on Browse in the ‘File to import’ section and select your amended SQL file. Click Go to proceed.
Step 3b (click to enlarge)
If everything went well you should see table names on the left hand side and a message saying something similar to this: ‘Import has been successfully finished, 162 queries executed.’ You’re done and deserve another coffee.
Step 3c (click to enlarge)

Step 4 – Upload Wordpress Files

In this step you should use your favourite FTP client to upload all files to your destination server. If you created a brand new website than you can upload everything including index.php file. If you upgrading an existing website then you have to make sure that it will work until you launch your WP website. DON’T DELETE ANY FILES that belongs to your existing website. Make sure your Wordpress website works first, then you’re safe to delete the old files.
To make your website work you should update wp-config.php file with your database details: database name, database server address, database user and password. Once done, you should be able to see your new website at http://www.yoursite.com/
Now, you have to test if you can login to the administration panel. So type in http://www.yoursite.com/wp-admin/ to find out. If you can see WP admin login screen you’re half way there. Type in your login details and login. If you’re successfull you should see WP Dashboard.
That’s it. You’re done.

Step 5 – Fine Tuning your Wordpress website

Few other thing you should take care of:
  • Make sure that you can upload any new images or documents. If you can’t it means that you have to change files/folders permissions and give Wordpress read/write right for necessary folders.
  • Check if your permalink structure works. Amend if necessary.
  • Make sure you’re running the latest version of Wordpress and upgrade automatically to the newest one where possible.
  • Check if you have installed latest versions of any plugins that you’re using. Be careful though! Some plugins require PHP5 to work properly or require additional libraries to be enabled. Check this prior to any upgrades.

Friday, December 16, 2011

Install Microsoft (UAA) High Definition Audio class on Windows XP SP3


How to install  kb888111 in Windows XP SP3, 
If you have a sound problem after Windows XP (SP2 and SP3) installed on their laptop...
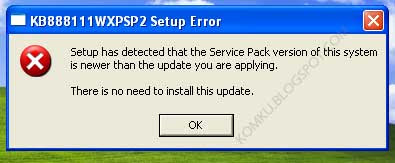
this post (Laptop Sound Problem - How to Solve it) will solve sound problem on Windows XP SP2, on step 3, you need to install kb888111, but this message will appear when you try to install it on Windows XP SP3 :

KB888111WXPSP2 Setup Error Setup has detected that the Service Pack version of this system is newer than the update you are applying. There is no need to install this update.


Follow this guide to install Microsoft (UAA) High Definition Audio class (kb888111) on Windows XP SP3 :

step 1:
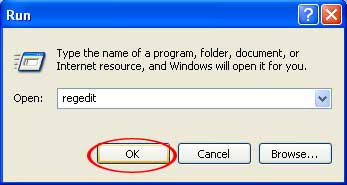
Click Start > Run... > type regedit > click OK 


step 2:
Locate
HKEY_LOCAL_MACHINE\SYSTEM\CurrentControlSet\Control\Windows 
then double click on CSDVersion


step 3:
Change CSDVersion value data from 300 to 200 then click OK


step 4:
You can close regedit window then please restart your laptop...
done.. now you can install KB888111 on yur Windows XP SP3
blogger-emoticon.blogspot.com


Microsoft (UAA) High Definition Audio class (KB888111) setup window on XP SP3


original post is here 

Saturday, December 10, 2011

Laptop Sound problem for Windows XP SP2

 laptop sound after install Windows XP SP2....
for everyone please try this :

step 1 :
Please uninstall any audio drivers and Microsoft UAA (kb888111) - if it's installed....

step 2:
this will open device manager
Click Start > Run... > type devmgmt.msc > press Enter
On Device Manager, please uninstall (right click > select Uninstall) a PCI device marked as unknown (e.g. with a '!' or maybe Yellow question mark)
then Restart your laptop.

step 3:
After your laptop restarted,
Windows will ask you to install automatically the drivers for Microsoft UAA Bus.
Cancel it and install this kb888111 - Universal Audio Architecture (UAA) High Definition Audio (Download for XP SP2)
Restart your laptop


step 4:
After laptop restart
windows will once more ask you to install automatically the drivers for Microsoft UAA Bus.
let windows install it automatically....
then please install the sound driver (e.g. Realtek Sound Driver)


Original Post is here

Wednesday, November 23, 2011

Customizing Fan and Business Pages on Facebook


Tips on customizing your fan and business pages on facebook, original link is here

Table of contents
  • 1. Discovering Facebook Pages
  • 2. Creating a Username and Adding Photos
  • 3. Apps to Add Custom Content
  • 4. Apps to Add Social Features
  • 5. Create Custom Tabs with iFrame Apps
  • 6. Create Custom Tabs from Scratch
  • 7. There’s More Ways to Customize

1. Discovering Facebook Pages

You probably have a Facebook profile, but does your band, business or client have a Facebook Page? Pages are a great way to connect with fans and consumers, and we're going to show you how to customize and maximize your FB Page.
Zoom
Social networking king Facebook is one of the most visited websites in the world. It has over 500 million active users with 50% logging in daily, and users spend over 700 billion minutes per month using the service. While you and most of your friends and family have a Facebook profile, Facebook Pages - whether for a business, organization, band, group, cause, or celebrity – are something entirely different. Pages can help in marketing and awareness, as well as customer and fan communication.
Your Facebook Page can serve as a website where you can display your business or organization details and keep customers or fans up-to-date with happenings, new products, and other news. When Facebook users “Like” your Page, they’ll see your posts in their News Feed, plus their friends will be notified in their News Feed that you “Like” a specific Page. Given that the average user has 130 friends, the potential exposure and buzz is something to be desired, for sure.
Zoom

Monday, November 21, 2011

39 Business Apps for your Facebook Pages


There are so many ways you can enhance your Facebook Page by adding applications.
Here are 39 business applications for your Facebook Page.
Social RSS 39 Business Apps for your Facebook Page
Social RSS by Social Revitalizer
Social RSS allows you to add your blog/favourite RSS feeds to your wall, boxes tab or a dedicated tab on your profile or Facebook Page. It updates automatically and lets your readers subscribe to the feeds if they wish!
Payvment E Commerce Storefront 39 Business Apps for your Facebook Page
Payvment E-Commerce Storefront by Payvment, Inc.
Launch a professional full-featured e-commerce storefront on Facebook. Features built-in search enabling millions of Facebook users to discover your storefront and products. Plus the storefront and shopping cart supports over 20 world currencies.
easypromos 39 Business Apps for your Facebook Page
Easypromos by Omatech
Easypromos is an application to add promotions to your Facebook page. Manage and customize your own promotions. Create exclusive promos for your fans and launch competitions for your users and let them vote for the winners.
Hy.ly Welcome Tab 39 Business Apps for your Facebook Page
Hy.ly Welcome Tab by Hy.ly
Build your FANBASE.
Get your 1st time visitors to “Like” your Page. Design and publish your Welcome Tab in minutes. No FBML or HTML required.
eSocialStore  39 Business Apps for your Facebook Page
eSocialStore by Bilginet
eSocialStore is a special Facebook application for HemenAl e-commerce platform members to transfer their products to transfer fan pages.

Monday, November 14, 2011

10 Apps to Make Your Facebook Page More Engaging.

Another great info for your facebook page, original link is here

welcome 10 Apps to Make Your Facebook Page More Engaging.
No one likes a Facebook Page that is barren and boring least of all the people who pressed that ‘Like’ button. This post will share 10 apps that will help make your Page more engaging.
The Facebook Pages apps are just like the apps on your Facebook Profile, nothing tricky about it at all. If you manage a Page, I highly recommend adding apps from the list below to quickly and effortlessly make your Page more interesting.
Welcome Tab For Pages: Showcase just about anything in your Page, from profiles and businesses to products and upcoming events. It’s an ideal way to make a great first impression. It also comes with its own analytics and metrics, so that you can track and measure how your Welcome tab is being received and make adjustments accordingly.
Twitter for Pages: There are a few Twitter apps on Facebook however most of them break frequently or are made for Profiles and not Pages. However there is a good Twitter for Pages called Involver. It’s quick and easy to install, just add and you’re done. It’s a simple way to bring your Twitter stream into a tab of its own and keep people connected to your Tweets from Facebook.
Flickr: Showcase your photo stream with this pretty app. Add it to your Page and the tab will display multiple collections. You can select either set or collection view. It also plans to allow further customization in the future. There are 180,000 active users for this app and you can also add it to your profile. Just hit the, Add to My Page button.
flickr 10 Apps to Make Your Facebook Page More Engaging.
EventBrite LOGO 300x200 10 Apps to Make Your Facebook Page More Engaging. Eventbrite: If you host/promote events, then you should consider adding this app. It’s created by the online event management and ticketing services company of the same name and publishes an event tab on your Facebook Page, with your event details and a link to buy tickets. Additionally there are options to share/retweet the event in newsfeeds and Facebook Profiles.

Monday, November 7, 2011

4 Essential Facebook Page Apps to Improve Communication With Fans

Another good info from Mashable, original post please link here:

This post originally appeared on the American Express OPEN Forum, where Mashable regularly contributes articles about leveraging social media and technology in small business.
The number of Facebook applications can seem a little overwhelming at times. While Facebook doesn’t share an exact number, an independent website called AppData monitors trends for over 100,000 Facebook applications, which is a lot to sift through.
As a business, trying to determine which of those apps can help your organization can be daunting. To get you started, here are four essential Facebook apps that allow you to better reach and communicate with your audience, as well as save you time for all those other things you have to do.

1. Tweets to Pages — Display Your Twitter Feed


Tweets to Pages, which has 1.2 million monthly active users, will create a tab on your Facebook Page that displays a timeline of your company’s most recent tweets. This is a great feature for providing additional, real-time information to Facebook users who don’t have a Twitter account and for avoiding the annoyance your fans would feel if you were to constantly stream your tweets to Facebook as wall updates. The app is very easy to set up, and the free version allows you to adjust the number of tweets that show on the Tweets to Pages tab.
If you want to upgrade to the paid version, you can better control your content limits, choose a color scheme, add a banner and allow comments on your tweets.

Friday, July 8, 2011

DLink DSL-2640B wireless connection problem

Recently I brought a DLink DSL-2640B to replace my client faulty wireless router. When I finish configure the router modem, all the thing is working fine except it can't connect to the internet. At first I thought the password is wrong, but I check with the ISP (TMNet) that my password is correct. I already try to upload another version of firmware but it still can't solve my problem. Hmm weird, then I have no choice to bring the modem back to check.

Emax Search Engine

Custom Search